Photographing Wildflowers -Tips for Creating Natural Looking Light with Flash
While observing the Shelter in Place restrictions I thought that I might do a little “Photography in Place”. Here is my tutorial on how to create a flower portrait.
After 8 days under SIP I finally had a reprieve from rescheduling workshops and catching up on the honey-do list. With wildflower season upon us I decided to break out the macro gear, venture into my front yard, take some photos and amuse the neighbors.
I broke out the Canon 5DmIV with 100mm Macro, grabbed my pop out diffuser and headed for the yard to see what I could find. This time of year our yard is full of California poppies. I began hunting for the right angle, one that would not include my mailbox, the streetlamp or other urban distractions. The light was diffused, and the resulting photos did not really “pop”. In addition the wind was blowing and in order to achieve a fast enough shutter speed to freeze the movement of the flowers it was necessary to boost the ISO to 1600 to prevent blurring.
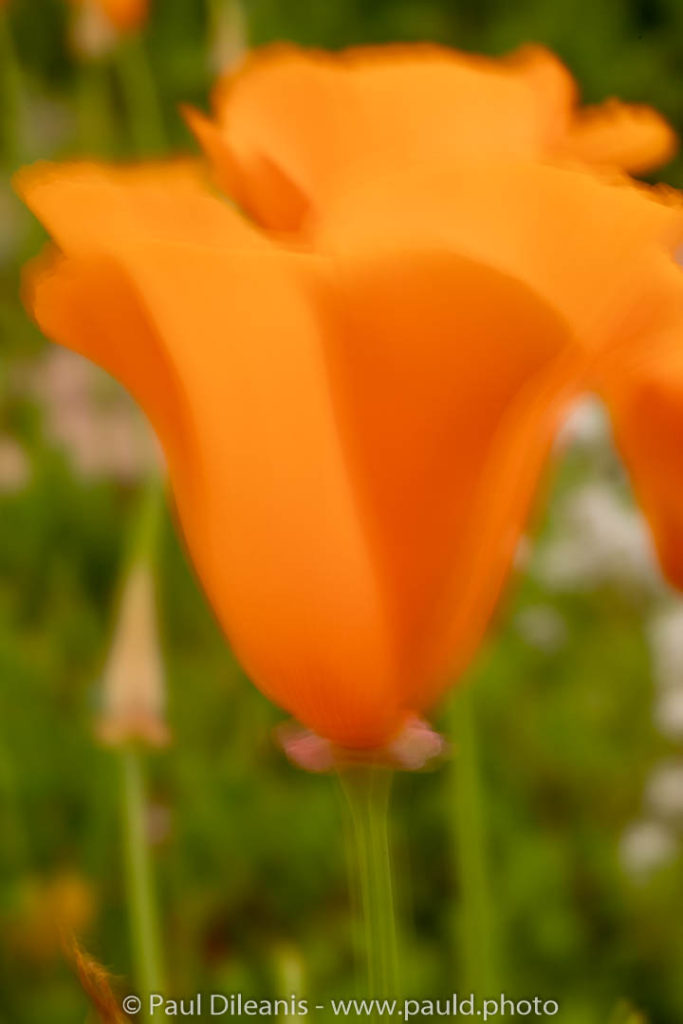
After a few attempts to capture the right image I decided this would be a great day to practice creating my own “sunshine” and to make the poppy “bend to my vision” as Ansel Adams would say.
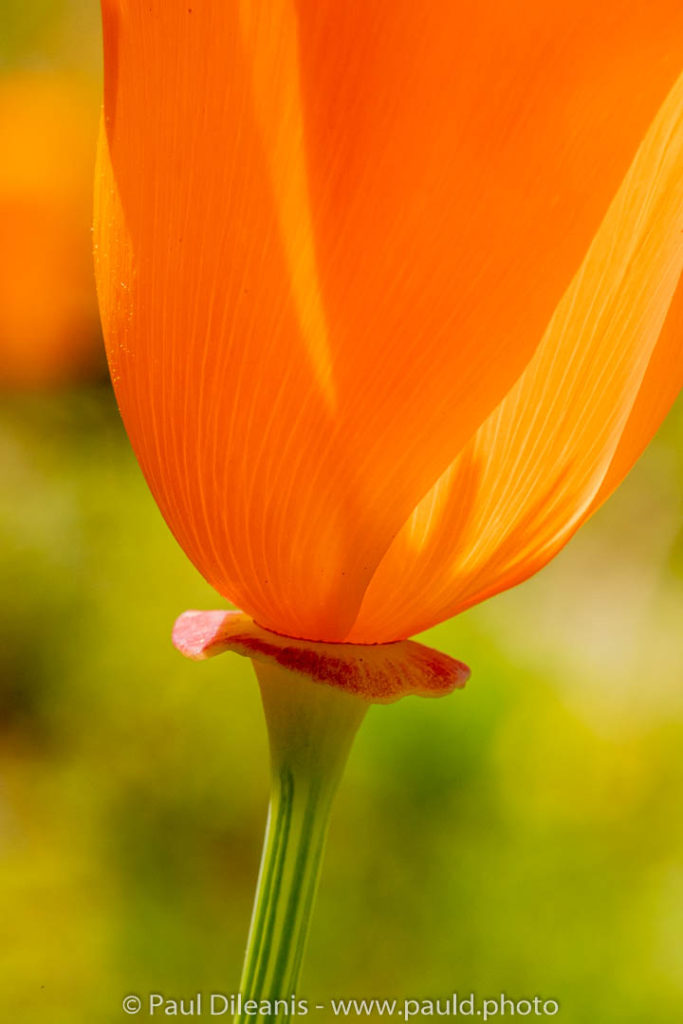
To me the underside of the poppy flower reminds me of a torch. The stem is the handle with the base of the flower pedals transformed into flames when back-lit.
Keep reading if you would like to see how I set up the flashes to create the lighting in the photograph below. There is a complete list of equipment at the end of the article.

There are times when I am fortunate to encounter ideal lighting when out photographing wildflowers. Often though, I discover the perfect specimen to photograph only to find it is either in the shade or the weather is like it was today with a heavy overcast, wind and flat light. it is not always practical to return another day so it becomes necessary to create my own “ideal” light.
Using off camera flashes to create flower portraits, as I like to call them, is a challenge. The quality of light from a flash can be harsh and un-natural requiring the use of diffusers to modify the light. With my vision firmly in mind I retreated back into the house and emerged a few minutes later with 2 flash units, a Nissin wireless flash trigger system, a Rogue large flash modifier, a light stand, a 5/8” wooden dowel, and some wire plant supports for the diffuser.
Using flash for macro photography has several advantages;
- The flashes provide a fast effective shutter speed to freeze wind blown flowers at lower ISO’s for better quality.
- Controlling ambient light. Light from the flash is brighter than the ambient light and drops off quickly so it allows you to darken the background in order to hide distractions and make the subject stand out.
- Greater depth of field. The bright light from the flashes allows me to use an aperture of f16 or higher for better depth of field.
The first setup involved one flash with the Rogue flash diffuser on the light stand and placed above and slightly behind the flower to simulate the sun overhead. Here is the set up and resulting images.
Single flash set up. Click on an image to view larger version.
The first image is with no flash at ISO 1600, 1/60 sec. at f10. I had to wait patiently for the wind to pause before releasing the shutter. After setting up the flash with diffuser I was able to drop the ISO to 400, increase the shutter speed to 1/160 sec. and change the f-stop to 16. Notice the change in DoF and how dark the background has become in the second image.
After reviewing the image I decided that I needed additional light on the flower stem. First I set up a second flash with diffusion material mounted on the 5/8” dowel stuck in the ground to the left of the camera and a few feet from the subject. The first test exposure illustrates why learning to control the light is important. If all my flash images of flowers looked like this I would chuck the flash into the nearest dumpster.
Two flash set up. Click on an image to view larger version.


In order to create a more natural looking fill light I moved the flash a little farther back. In addition, I clipped a diffuser to two wire plant holders and placed it between the flash and the subject (See the photo of the second set up). Notice the resulting softening of the fill light. Those of you who are observant might have noticed that I also changed the camera angle slightly. I had been using some shrubbery as a background, but now you can make out the street that runs in front of my house and a feint outline of my neighbors garage door. Boosting the shutter speed to 1/320 sec. did not darken the background enough to hide it. In the next image I clip a piece of black matte board to two additional plant holders behind the subject. Viola! Problem solved.
Now, I could have stopped here, but the perfectionist in me had to make one additional tweak. I moved the fill light to the left of the subject to create a rim light effect. This resulted in a less flat light and made the texture on the stem pop in the final image.
Equipment used to create these images:
- Camera – Canon 5DMkIV with Canon EF 100/2.8L IS Macro lens
- Flashes – Canon 580EXII and Canon 430EX
- Nissin Wireless Flash Triggers – AIR 1 transmitter and two AIR R receivers
- Rogue Large Reflector with soft box cover
- 12 inch pop out diffusion panel
- 11×14 black matte board for background
- 4 wire plant stem holders and clips to support diffuser and background
- light stand
- 5/8″ wooden dowel. A standard flash holder for light stands will fit over the dowel to support a flash in the field.
Hello Paul,
Nice to see your post. I think it important that folks get away from the news which is not new and your post is a way to do that. I just subscribed to Lynda.com through Linkedin where they have 7,000 presentations for photography alone.
I just purchased a lens ball and plan to play with that while in solitary confinement. Hope you and your family is well. Thank you.
Jim.
Paul, I have the 135mm f2.0 lens, which is not described as a Macro lens. Will this be a suitable lens for this type of photography?
Thanks and hope you and your family are staying well.
Viggy
Viggy,
You will be able to use the 135/2.0 lens. Minimum focus distance on this lens is 3 ft. (0.9 M). With a full frame sensor a subject that is 9.5 in. (24 cm) would fill the frame. With an APS-C sensor a subject that is 6.5 in. (16.5 cm) will fill the frame. If you need to get closer you would have to add an extension tube or a magnifying filter (diopter) to the lens. Let me know if you have more questions.
Paul